


来源:pettyandydog
pettyandydog.com/2017/07/27/concurrentHashMap/
现在我们来对每一步的细节进行源码分析,在第一步中,符合条件会进行初始化操作,我们来看看initTable()方法
/**
 * Initializes table, using the size recorded in sizeCtl.
 */
private final Node<K,V>[] initTable() {

    Node<K,V>[] tab; int sc;

    while ((tab = table) == null || tab.length == 0) {//空的table才能进入初始化操作
        if ((sc = sizeCtl) < 0) //sizeCtl<0表示其他线程已经在初始化了或者扩容了,挂起当前线程
            Thread.yield(); // lost initialization race; just spin
        else if (U.compareAndSwapInt(this, SIZECTL, sc, -1)) {//CAS操作SIZECTL为-1,表示初始化状态
            try {
                if ((tab = table) == null || tab.length == 0) {
                    int n = (sc > 0) ? sc : DEFAULT_CAPACITY;
                    @SuppressWarnings("unchecked")
                    Node<K,V>[] nt = (Node<K,V>[])new Node<?,?>[n];//初始化
                    table = tab = nt;
                    sc = n - (n >>> 2);//记录下次扩容的大小
                }
            } finally {
                sizeCtl = sc;
            }
            break;
        }
    }
    return tab;
}
在第二步中没有hash冲突就直接调用Unsafe的方法CAS插入该元素,进入第三步如果容器正在扩容,则会调用helpTransfer()方法帮助扩容,现在我们跟进helpTransfer()方法看看
/**
 *帮助从旧的table的元素复制到新的table中
 */
final Node<K,V>[] helpTransfer(Node<K,V>[] tab, Node<K,V> f) {

    Node<K,V>[] nextTab; int sc;

    if (tab != null && (f instanceof ForwardingNode) &&
        (nextTab = ((ForwardingNode<K,V>)f).nextTable) != null) { //新的table nextTba已经存在前提下才能帮助扩容
        int rs = resizeStamp(tab.length);
        while (nextTab == nextTable && table == tab &&
               (sc = sizeCtl) < 0) {
            if ((sc >>> RESIZE_STAMP_SHIFT) != rs || sc == rs + 1 ||
                sc == rs + MAX_RESIZERS || transferIndex <= 0)
                break;
            if (U.compareAndSwapInt(this, SIZECTL, sc, sc + 1)) {
                transfer(tab, nextTab);//调用扩容方法
                break;
            }
        }
        return nextTab;
    }
    return table;
}
其实helpTransfer()方法的目的就是调用多个工作线程一起帮助进行扩容,这样的效率就会更高,而不是只有检查到要扩容的那个线程进行扩容操作,其他线程就要等待扩容操作完成才能工作。
既然这里涉及到扩容的操作,我们也一起来看看扩容方法transfer()
private final void transfer(Node<K,V>[] tab, Node<K,V>[] nextTab) {

        int n = tab.length, stride;

        // 每核处理的量小于16,则强制赋值16
        if ((stride = (NCPU > 1) ? (n >>> 3) / NCPU : n) < MIN_TRANSFER_STRIDE)
            stride = MIN_TRANSFER_STRIDE; // subdivide range

        if (nextTab == null) {            // initiating
            try {
                @SuppressWarnings("unchecked")
                Node<K,V>[] nt = (Node<K,V>[])new Node<?,?>[n << 1];        //构建一个nextTable对象,其容量为原来容量的两倍
                nextTab = nt;
            } catch (Throwable ex) {      // try to cope with OOME
                sizeCtl = Integer.MAX_VALUE;
                return;
            }
            nextTable = nextTab;
            transferIndex = n;
        }

        int nextn = nextTab.length;

        // 连接点指针,用于标志位(fwd的hash值为-1,fwd.nextTable=nextTab)
        ForwardingNode<K,V> fwd = new ForwardingNode<K,V>(nextTab);

        // 当advance == true时,表明该节点已经处理过了
        boolean advance = true;
        boolean finishing = false; // to ensure sweep before committing nextTab
        for (int i = 0, bound = 0;;) {

            Node<K,V> f; int fh;

            // 控制 --i ,遍历原hash表中的节点
            while (advance) {
                int nextIndex, nextBound;
                if (--i >= bound || finishing)
                    advance = false;
                else if ((nextIndex = transferIndex) <= 0) {
                    i = -1;
                    advance = false;
                }
                // 用CAS计算得到的transferIndex
                else if (U.compareAndSwapInt
                        (this, TRANSFERINDEX, nextIndex,
                                nextBound = (nextIndex > stride ?
                                        nextIndex - stride : 0))) {
                    bound = nextBound;
                    i = nextIndex - 1;
                    advance = false;
                }
            }

            if (i < 0 || i >= n || i + n >= nextn) {
                int sc;

                // 已经完成所有节点复制了
                if (finishing) {
                    nextTable = null;
                    table = nextTab;        // table 指向nextTable
                    sizeCtl = (n << 1) - (n >>> 1);     // sizeCtl阈值为原来的1.5倍
                    return;     // 跳出死循环,
                }

                // CAS 更扩容阈值,在这里面sizectl值减一,说明新加入一个线程参与到扩容操作
                if (U.compareAndSwapInt(this, SIZECTL, sc = sizeCtl, sc - 1)) {
                    if ((sc - 2) != resizeStamp(n) << RESIZE_STAMP_SHIFT)
                        return;
                    finishing = advance = true;
                    i = n; // recheck before commit
                }
            }

            // 遍历的节点为null,则放入到ForwardingNode 指针节点
            else if ((f = tabAt(tab, i)) == null)
                advance = casTabAt(tab, i, null, fwd);

            // f.hash == -1 表示遍历到了ForwardingNode节点,意味着该节点已经处理过了
            // 这里是控制并发扩容的核心
            else if ((fh = f.hash) == MOVED)
                advance = true; // already processed
            else {

                // 节点加锁
                synchronized (f) {

                    // 节点复制工作
                    if (tabAt(tab, i) == f) {
                        Node<K,V> ln, hn;

                        // fh >= 0 ,表示为链表节点
                        if (fh >= 0) {
                            // 构造两个链表  一个是原链表  另一个是原链表的反序排列
                            int runBit = fh & n;
                            Node<K,V> lastRun = f;
                            for (Node<K,V> p = f.next; p != null; p = p.next) {
                                int b = p.hash & n;
                                if (b != runBit) {
                                    runBit = b;
                                    lastRun = p;
                                }
                            }
                            if (runBit == 0) {
                                ln = lastRun;
                                hn = null;
                            }
                            else {
                                hn = lastRun;
                                ln = null;
                            }
                            for (Node<K,V> p = f; p != lastRun; p = p.next) {
                                int ph = p.hash; K pk = p.key; V pv = p.val;
                                if ((ph & n) == 0)
                                    ln = new Node<K,V>(ph, pk, pv, ln);
                                else
                                    hn = new Node<K,V>(ph, pk, pv, hn);
                            }
                            // 在nextTable i 位置处插上链表
                            setTabAt(nextTab, i, ln);
                            // 在nextTable i + n 位置处插上链表
                            setTabAt(nextTab, i + n, hn);
                            // 在table i 位置处插上ForwardingNode 表示该节点已经处理过了
                            setTabAt(tab, i, fwd);
                            // advance = true 可以执行--i动作,遍历节点
                            advance = true;
                        }

                        // 如果是TreeBin,则按照红黑树进行处理,处理逻辑与上面一致
                        else if (f instanceof TreeBin) {
                            TreeBin<K,V> t = (TreeBin<K,V>)f;
                            TreeNode<K,V> lo = null, loTail = null;
                            TreeNode<K,V> hi = null, hiTail = null;
                            int lc = 0, hc = 0;
                            for (Node<K,V> e = t.first; e != null; e = e.next) {
                                int h = e.hash;
                                TreeNode<K,V> p = new TreeNode<K,V>
                                        (h, e.key, e.val, null, null);
                                if ((h & n) == 0) {
                                    if ((p.prev = loTail) == null)
                                        lo = p;
                                    else
                                        loTail.next = p;
                                    loTail = p;
                                    ++lc;
                                }
                                else {
                                    if ((p.prev = hiTail) == null)
                                        hi = p;
                                    else
                                        hiTail.next = p;
                                    hiTail = p;
                                    ++hc;
                                }
                            }

                            // 扩容后树节点个数若<=6,将树转链表
                            ln = (lc <= UNTREEIFY_THRESHOLD) ? untreeify(lo) :
                                    (hc != 0) ? new TreeBin<K,V>(lo) : t;
                            hn = (hc <= UNTREEIFY_THRESHOLD) ? untreeify(hi) :
                                    (lc != 0) ? new TreeBin<K,V>(hi) : t;
                            setTabAt(nextTab, i, ln);
                            setTabAt(nextTab, i + n, hn);
                            setTabAt(tab, i, fwd);
                            advance = true;
                        }
                    }
                }
            }
        }
    }
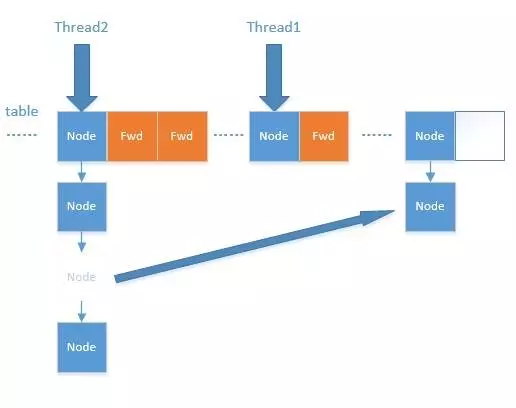
扩容过程有点复杂,这里主要涉及到多线程并发扩容,ForwardingNode的作用就是支持扩容操作,将已处理的节点和空节点置为ForwardingNode,并发处理时多个线程经过ForwardingNode就表示已经遍历了,就往后遍历,下图是多线程合作扩容的过程:
介绍完扩容过程,我们再次回到put流程,在第四步中是向链表或者红黑树里加节点,到第五步,会调用treeifyBin()方法进行链表转红黑树的过程。
private final void treeifyBin(Node<K,V>[] tab, int index) {
    Node<K,V> b; int n, sc;

    if (tab != null) {
        //如果整个table的数量小于64,就扩容至原来的一倍,不转红黑树了
        //因为这个阈值扩容可以减少hash冲突,不必要去转红黑树
        if ((n = tab.length) < MIN_TREEIFY_CAPACITY)
            tryPresize(n << 1);
        else if ((b = tabAt(tab, index)) != null && b.hash >= 0) {
            synchronized (b) {
                if (tabAt(tab, index) == b) {
                    TreeNode<K,V> hd = null, tl = null;

                    for (Node<K,V> e = b; e != null; e = e.next) {

                        //封装成TreeNode
                        TreeNode<K,V> p = new TreeNode<K,V>(e.hash, e.key, e.val, null, null);

                        if ((p.prev = tl) == null)
                            hd = p;
                        else
                            tl.next = p;
                        tl = p;
                    }

                    //通过TreeBin对象对TreeNode转换成红黑树
                    setTabAt(tab, index, new TreeBin<K,V>(hd));
                }
            }
        }
    }
}
到第六步表示已经数据加入成功了,现在调用addCount()方法计算ConcurrentHashMap的size,在原来的基础上加一,现在来看看addCount()方法。
private final void addCount(long x, int check) {

    CounterCell[] as; long b, s;

    //更新baseCount,table的数量,counterCells表示元素个数的变化
    if ((as = counterCells) != null ||
        !U.compareAndSwapLong(this, BASECOUNT, b = baseCount, s = b + x)) {

        CounterCell a; long v; int m;
        boolean uncontended = true;

        //如果多个线程都在执行,则CAS失败,执行fullAddCount,全部加入count
        if (as == null || (m = as.length - 1) < 0 ||
            (a = as[ThreadLocalRandom.getProbe() & m]) == null ||
            !(uncontended =
              U.compareAndSwapLong(a, CELLVALUE, v = a.value, v + x))) {

            fullAddCount(x, uncontended);
            return;
        }

        if (check <= 1)
            return;

        s = sumCount();
    }

     //check>=0表示需要进行扩容操作
    if (check >= 0) {
        Node<K,V>[] tab, nt; int n, sc;

        while (s >= (long)(sc = sizeCtl) && (tab = table) != null && (n = tab.length) < MAXIMUM_CAPACITY) {
            int rs = resizeStamp(n);

            if (sc < 0) {
                if ((sc >>> RESIZE_STAMP_SHIFT) != rs || sc == rs + 1 ||
                    sc == rs + MAX_RESIZERS || (nt = nextTable) == null ||
                    transferIndex <= 0)
                    break;

                if (U.compareAndSwapInt(this, SIZECTL, sc, sc + 1))
                    transfer(tab, nt);
            }

            //当前线程发起库哦哦让操作,nextTable=null
            else if (U.compareAndSwapInt(this, SIZECTL, sc,
                                         (rs << RESIZE_STAMP_SHIFT) + 2))
                transfer(tab, null);
            s = sumCount();
        }
    }
}
put的流程现在已经分析完了,你可以从中发现,他在并发处理中使用的是乐观锁,当有冲突的时候才进行并发处理,而且流程步骤很清晰,但是细节设计的很复杂,毕竟多线程的场景也复杂。
GET操作
我们现在要回到开始的例子中,我们对个人信息进行了新增之后,我们要获取所新增的信息,使用String name = map.get(“name”)获取新增的name信息,现在我们依旧用debug的方式来分析下ConcurrentHashMap的获取方法get()
public V get(Object key) {
    Node<K,V>[] tab; Node<K,V> e, p; int n, eh; K ek;
    int h = spread(key.hashCode()); //计算两次hash

    if ((tab = table) != null && (n = tab.length) > 0 &&
        (e = tabAt(tab, (n - 1) & h)) != null) {//读取首节点的Node元素
        if ((eh = e.hash) == h) { //如果该节点就是首节点就返回
            if ((ek = e.key) == key || (ek != null && key.equals(ek)))
                return e.val;
        }

        //hash值为负值表示正在扩容,这个时候查的是ForwardingNode的find方法来定位到nextTable来
        //查找,查找到就返回
        else if (eh < 0)
            return (p = e.find(h, key)) != null ? p.val : null;

        while ((e = e.next) != null) {//既不是首节点也不是ForwardingNode,那就往下遍历
            if (e.hash == h &&
                ((ek = e.key) == key || (ek != null && key.equals(ek))))
                return e.val;
        }
    }
    return null;
}
ConcurrentHashMap的get操作的流程很简单,也很清晰,可以分为三个步骤来描述:
- 计算hash值,定位到该table索引位置,如果是首节点符合就返回
- 如果遇到扩容的时候,会调用标志正在扩容节点ForwardingNode的find方法,查找该节点,匹配就返回
- 以上都不符合的话,就往下遍历节点,匹配就返回,否则最后就返回null
size操作
最后我们来看下例子中最后获取size的方式int size = map.size();,现在让我们看下size()方法:
public int size() {
    long n = sumCount();

    return ((n < 0L) ? 0 :
            (n > (long)Integer.MAX_VALUE) ? Integer.MAX_VALUE :
            (int)n);
}

final long sumCount() {
    CounterCell[] as = counterCells; CounterCell a; //变化的数量
    long sum = baseCount;

    if (as != null) {
        for (int i = 0; i < as.length; ++i) {
            if ((a = as[i]) != null)
                sum += a.value;
        }
    }

    return sum;
}
在JDK1.8版本中,对于size的计算,在扩容和addCount()方法就已经有处理了,JDK1.7是在调用size()方法才去计算,其实在并发集合中去计算size是没有多大的意义的,因为size是实时在变的,只能计算某一刻的大小,但是某一刻太快了,人的感知是一个时间段,所以并不是很精确。
总结与思考
其实可以看出JDK1.8版本的ConcurrentHashMap的数据结构已经接近HashMap,相对而言,ConcurrentHashMap只是增加了同步的操作来控制并发,从JDK1.7版本的ReentrantLock+Segment+HashEntry,到JDK1.8版本中synchronized+CAS+HashEntry+红黑树,相对而言,总结如下思考:
- JDK1.8的实现降低锁的粒度,JDK1.7版本锁的粒度是基于Segment的,包含多个HashEntry,而JDK1.8锁的粒度就是HashEntry(首节点)
- JDK1.8版本的数据结构变得更加简单,使得操作也更加清晰流畅,因为已经使用synchronized来进行同步,所以不需要分段锁的概念,也就不需要Segment这种数据结构了,由于粒度的降低,实现的复杂度也增加了
- JDK1.8使用红黑树来优化链表,基于长度很长的链表的遍历是一个很漫长的过程,而红黑树的遍历效率是很快的,代替一定阈值的链表,这样形成一个最佳拍档
- JDK1.8为什么使用内置锁synchronized来代替重入锁ReentrantLock,我觉得有以下几点:
- 因为粒度降低了,在相对而言的低粒度加锁方式,synchronized并不比ReentrantLock差,在粗粒度加锁中ReentrantLock可能通过Condition来控制各个低粒度的边界,更加的灵活,而在低粒度中,Condition的优势就没有了
- JVM的开发团队从来都没有放弃synchronized,而且基于JVM的synchronized优化空间更大,使用内嵌的关键字比使用API更加自然
- 在大量的数据操作下,对于JVM的内存压力,基于API的ReentrantLock会开销更多的内存,虽然不是瓶颈,但是也是一个选择依据
评论区